- Next.js 環境構築
- PrismaとPostgreSQLの設定 👈ココ
- NextAuth ログイン機能の実装
- NextAuth ログイン制御の実施・機能拡張
- Tiptapでマークダウンエディタ作成
- 日記の登録
- 画像のアップロード MinIOの設定
概要
ここでは日記アプリケーションで使うDBの設定を整えていきます。
ORMとしてPrismaを利用し、Prismaのスキーマ定義からPostgreSQLに反映する手順でDBを構築します。
DB用のDocker Composeを作成する
PostgreSQLをコンテナで立ち上げるため、compse.yamlファイルを作成します。
※Dockerのインストールが必要です
compose.yamlの作成
プロジェクト直下にcompose.yamlを作成し、PostgreSQLの定義を追加します。
コンテナは tiptap-diary という名前で作成し、DB設定は 環境変数 に従う形とします。
volumes:
  tiptap-diary-data-volume:
    name: tiptap-diary-data
    driver: local
services:
  tiptap-diary:
    container_name: tiptap-diary
    image: postgres:latest
    volumes:
      - tiptap-diary-data-volume:/var/lib/postgresql/data
    ports:
      - "5432:5432"
    environment:
      - POSTGRES_DATABASE=${POSTGRES_DATABASE}
      - POSTGRES_USER=${POSTGRES_USER}
      - POSTGRES_PASSWORD=${POSTGRES_PASSWORD}
      - POSTGRES_ROOT_PASSWORD=${POSTGRES_ROOT_PASSWORD}
.env.localに環境変数を追加
tiptap-diaryで使う環境変数を設定します。
# Docker env
POSTGRES_DATABASE=postgres
POSTGRES_USER=postgres
POSTGRES_PASSWORD=password
POSTGRES_ROOT_PASSWORD=root
PostgreSQLの起動
Prismaは設定時にDBを参照するので、あらかじめ起動しておきます。
(基本的に開発中は常時立ち上げておきます)
$ docker compose --env-file .env.local up -d
[+] Building 0.0s (0/0)                                                                                                                                                                                              docker:desktop-linux
[+] Running 3/3
 ✔ Network tiptap-diary_default  Created                                                                                                                                                                                             0.0s
 ✔ Volume "tiptap-diary-data"    Created                                                                                                                                                                                             0.0s
 ✔ Container tiptap-diary        Started                                                                                                                                                                                             0.0s

# 失敗してないことを確認しておく
$ docker compose --env-file .env.local ps
NAME           IMAGE             COMMAND                   SERVICE          CREATED          STATUS          PORTS
tiptap-diary   postgres:latest   "docker-entrypoint.s…"   tiptap-diary   44 seconds ago   Up 43 seconds   0.0.0.0:5432->5432/tcp

#もし失敗していた場合は起動時のログを確認する
$ docker compose --env-file .env.local logs tiptap-diary
Prismaのインストール・設定
ドキュメントは以下参照
Prismaパッケージ追加
開発用のprismaと、Next.jsから使う@prisma/clientを追加します。
$ pnpm add -D prisma

devDependencies:
+ prisma 5.7.1
Prisma clientのインストール
clientをインストールしてからデータベースの設定を行います。
prismaだけでも設定はできますが、clientに対して反映されないためimportしても使えない状態となります。
イメージは公式にあるこれが分かりやすいかも?
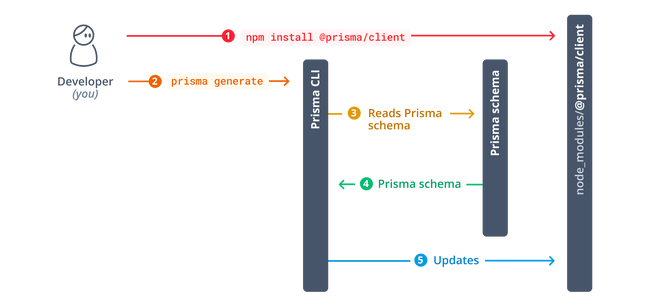
$ pnpm add @prisma/client

dependencies:
+ @prisma/client 5.7.1
Prismaの初期化
Next.jsプロジェクトのroot配下で以下を実行する
$ pnpx prisma init

✔ Your Prisma schema was created at prisma/schema.prisma
  You can now open it in your favorite editor.

warn You already have a .gitignore file. Don't forget to add `.env` in it to not commit any private information.

Next steps:
1. Set the DATABASE_URL in the .env file to point to your existing database. If your database has no tables yet, read https://pris.ly/d/getting-started
2. Set the provider of the datasource block in schema.prisma to match your database: postgresql, mysql, sqlite, sqlserver, mongodb or cockroachdb.
3. Run prisma db pull to turn your database schema into a Prisma schema.
4. Run prisma generate to generate the Prisma Client. You can then start querying your database.

More information in our documentation:
https://pris.ly/d/getting-started
prisma/schema.prisma が作成され、 .env に定義が追加されます。
今回は開発用なので .env.local にコピーします。
// This is your Prisma schema file,
// learn more about it in the docs: https://pris.ly/d/prisma-schema

generator client {
  provider = "prisma-client-js"
}

datasource db {
  provider = "postgresql"
  url      = env("DATABASE_URL")
}# Environment variables declared in this file are automatically made available to Prisma.
# See the documentation for more detail: https://pris.ly/d/prisma-schema#accessing-environment-variables-from-the-schema
# Prisma supports the native connection string format for PostgreSQL, MySQL, SQLite, SQL Server, MongoDB and CockroachDB.
# See the documentation for all the connection string options: https://pris.ly/d/connection-strings
DATABASE_URL="postgresql://johndoe:randompassword@localhost:5432/mydb?schema=public"DATABASE_URL を.env から .env.local にコピーして、Dockerで立ち上げたPostgresの接続情報を記載します
DATABASE_URL='postgresql://postgres:password@localhost:5432/postgres'Prismaのスキーマ定義
prisma initで作成された schema.prisma にテーブル定義を追加していきます。
日記管理としてDiary。他のテーブルはAuth.jsの情報をテーブル管理するために用意しています。
Prismaアダプターのリファレンスに従って追加し、パスワードログイン可能とするためUserテーブルにpasswordを追加しています。
diaryテーブルはuserそれぞれの所有になるので、合わせて関連付けしています。
※この登録だとUserを削除した場合にDIaryが消えません。消したい場合は onDelete: Cascade を付与します。
// This is your Prisma schema file,
// learn more about it in the docs: https://pris.ly/d/prisma-schema

generator client {
  provider = "prisma-client-js"
}

datasource db {
  provider = "postgresql"
  url      = env("DATABASE_URL")
}

model Account {
  id                 String  @id @default(cuid())
  userId             String
  type               String
  provider           String
  providerAccountId  String
  refresh_token      String?  @db.Text
  access_token       String?  @db.Text
  expires_at         Int?
  token_type         String?
  scope              String?
  id_token           String?  @db.Text
  session_state      String?

  user User @relation(fields: [userId], references: [id], onDelete: Cascade)

  @@unique([provider, providerAccountId])
}

model Session {
  id           String   @id @default(cuid())
  sessionToken String   @unique
  userId       String
  expires      DateTime
  user         User     @relation(fields: [userId], references: [id], onDelete: Cascade)
}

model User {
  id            String    @id @default(cuid())
  name          String?
  email         String?   @unique
  emailVerified DateTime?
  image         String?
  accounts      Account[]
  sessions      Session[]
  password      String?
  diaries       Diary[]
}

model VerificationToken {
  identifier String
  token      String   @unique
  expires    DateTime

  @@unique([identifier, token])
}

//日記
model Diary {
  id            String    @id @default(uuid())
  title         String?
  content       String?
  userId        String
  user          User      @relation(fields: [userId], references: [id])
  date          DateTime?
  published     Boolean   @default(false)
  publishedAt   DateTime?
  createdAt     DateTime  @default(now())
  updatedAt     DateTime  @updatedAt
}
DBを作成する
いくつかやり方はありますが、db pushが(試した限りでは)楽なのでこちらで実施します。
prismaは.envをデフォルトで読み込むので、.env.localを読み込むようにします(Dockerと同じ)。
公式の ドキュメントに従い、 dotenv-cliを用いて実現します
$ pnpm add -g dotenv-cli

+ dotenv-cli 7.3.0
実行時に以下エラーが出る場合は pnpm setup を打って PNPM_HOME のディレクトリを確認。
PNPM_HOME に移動した上で実行すれば追加できます。
※Windowsの場合はコンソールを管理者権限で実行する必要があるかもしれません
Run "pnpm setup" to create it automatically, or set the global-bin-dir setting, or the PNPM_HOME env variable. The global bin directory should be in the PATH.Prismaから db push を実行します。
$ dotenv -e .env.local -- pnpx prisma db push
Packages: +6
++++++
Progress: resolved 6, reused 6, downloaded 0, added 6, done
Prisma schema loaded from prisma/schema.prisma
Datasource "db": PostgreSQL database "postgres", schema "public" at "localhost:5432"

🚀  Your database is now in sync with your Prisma schema. Done in 108ms

✔ Generated Prisma Client (v5.7.1) to ./node_modules/.pnpm/@prisma+client@5.7.1_prisma@5.7.1/node_modules/@prisma/client in 70ms
リリース後などはmigrateで実施した方が良いはずです。
- この移行用に新しい SQL 移行ファイルを作成します
- データベースに対して SQL 移行ファイルを実行します。
prisma migrate dev か prisma db push によりPrisma Clientも再生性が行われます。
db pushはデータを全部消す動作だとどこかで読みましたが、消えない場合もあるのでいまいち動きを理解してません。
DBの確認
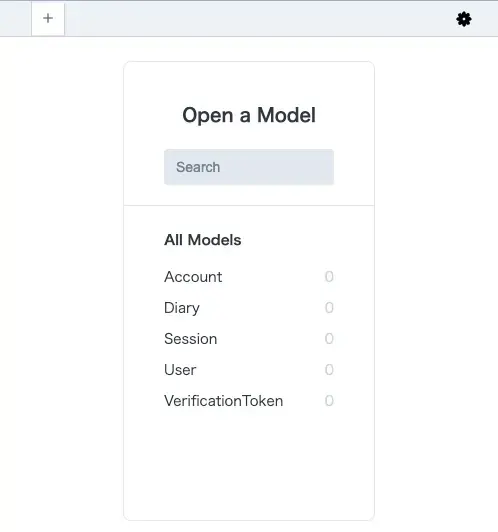
Prismaでは Studioという機能からデータベースを簡単に確認できるので、テーブルが作成されているかを確認しておきます。
$ pnpx prisma studio
Prisma schema loaded from prisma/schema.prisma
Prisma Studio is up on http://localhost:5555
画面からテーブルが確認できれば成功しています。
データベース接続インスタンスを作成する
PrismaClientのインスタンスを作成するライブラリを用意します。
import { PrismaClient } from "@prisma/client";

export const prisma = new PrismaClient();
本番環境では上記で良いはずですが、Next.jsの開発環境だとホットリロード時にインスタンスが多重起動されるため、以下のように作り直します(URL内の記事どおり)
Best practice for instantiating PrismaClient with Next.js
import { PrismaClient } from "@prisma/client";

const prismaClientSingleton = () => {
  return new PrismaClient();
};

type PrismaClientSingleton = ReturnType<typeof prismaClientSingleton>;

const globalForPrisma = globalThis as unknown as {
  prisma: PrismaClientSingleton | undefined;
};

const prisma = globalForPrisma.prisma ?? prismaClientSingleton();

export default prisma;

if (process.env.NODE_ENV !== "production") globalForPrisma.prisma = prisma;

//DBという名前でも使うのでexportしておく
export const db = prisma;
これでPrismaの利用準備が整いました。