4. GitHub認証
公式ドキュメントを参考にConvexの認証機能を実装する。
Convex Auth | Convex Developer Hub
Built-in authentication for Convex applications

β板のため仕様が変わる可能性があるので注意。
Convex Authのセットアップ
既存プロジェクトへのセットアップガイド参照
Convex Auth
Authentication library for your Convex backend
インストール
terminal
$ bun add @convex-dev/auth @auth/core
installed @convex-dev/auth@0.0.69 with binaries:
 - auth
installed @auth/core@0.35.0
初期化
初期化処理を実行。自動的にファイルを生成する。 マニュアルセットアップする場合はNoを選択。(マニュアルセットアップはこちら)
terminal
$ bunx @convex-dev/auth
✖ There are unstaged or uncommitted changes in the working directory. Please commit or stash them before proceeding.
? Continue anyway? Yes
i Step 1: Configure SITE_URL
? Enter the URL of your local web server (e.g. http://localhost:1234) http://localhost:3000
✔ Successfully set SITE_URL to http://localhost:3000 (on dev deployment modest-panda-566)

i Step 2: Configure private and public key
✔ Successfully set JWT_PRIVATE_KEY (on dev deployment modest-panda-566)
✔ Successfully set JWKS (on dev deployment modest-panda-566)

i Step 3: Modify tsconfig file
✔ The convex/tsconfig.json is already set up.

i Step 4: Configure auth config file
✔ Created convex/auth.config.ts

i Step 5: Initialize auth file
✔ Created convex/auth.ts

i Step 6: Configure http file
✔ Created convex/http.ts
✔ You're all set. Continue by configuring your schema and frontend.
スキーマの追加
手順どおり。
動作検証に使った task.ts は削除しておく( authTables のみ展開してるので、スキーマ定義に無いためエラーになる)
convex/schema.ts
import { authTables } from "@convex-dev/auth/server";
import { defineSchema } from "convex/server";

const schema = defineSchema({
  ...authTables,
  // Your other tables...
});

export default schema;
コマンド実行でスキーマが反映される。 すでに作成された tasks テーブルは削除されないので、コンソールから削除しておく。
terminal
$ bunx convex dev
✔ Schema validation complete.
✔ Added table indexes:
  [+] authAccounts.providerAndAccountId ["provider","providerAccountId","_creationTime"]
  [+] authAccounts.userIdAndProvider ["userId","provider","_creationTime"]
  [+] authRateLimits.identifier ["identifier","_creationTime"]
  [+] authRefreshTokens.sessionId ["sessionId","_creationTime"]
  [+] authSessions.userId ["userId","_creationTime"]
  [+] authVerificationCodes.accountId ["accountId","_creationTime"]
  [+] authVerificationCodes.code ["code","_creationTime"]
  [+] authVerifiers.signature ["signature","_creationTime"]
  [+] users.email ["email","_creationTime"]
  [+] users.phone ["phone","_creationTime"]
Downloading current deployment state...
Diffing local code and deployment state
Analyzing and deploying source code...
プロバイダの設定
src/app/layout.tsx
export default function RootLayout({
  children,
}: Readonly<{
  children: React.ReactNode;
}>) {
  return (
    <ConvexAuthNextjsServerProvider>
      <html lang="en">
        <body
          className={`${geistSans.variable} ${geistMono.variable} antialiased`}
        >
          <ConvexClientProvider>{children}</ConvexClientProvider>
        </body>
      </html>
    </ConvexAuthNextjsServerProvider>
  );
}
src/components/convex-client-provider.tsx
"use client";

import { ConvexAuthNextjsProvider } from "@convex-dev/auth/nextjs";
import { ConvexReactClient } from "convex/react";
import { ReactNode } from "react";

const convex = new ConvexReactClient(process.env.NEXT_PUBLIC_CONVEX_URL!);

export function ConvexClientProvider({ children }: { children: ReactNode }) {
  return (
    <ConvexAuthNextjsProvider client={convex}>
      {children}
    </ConvexAuthNextjsProvider>
  );
}
ミドルウェア追加
src/middleware.ts
import { convexAuthNextjsMiddleware } from "@convex-dev/auth/nextjs/server";

export default convexAuthNextjsMiddleware();

export const config = {
  // The following matcher runs middleware on all routes
  // except static assets.
  matcher: ["/((?!.*\\..*|_next).*)", "/", "/(api|trpc)(.*)"],
};
認証処理の設定
Convex Auth
Authentication library for your Convex backend
未ログインの場合はサインインページにリダイレクトするように設定。
逆にログイン済みの場合、/authにアクセスした場合はホームページにリダイレクトするように設定。
src/middleware.ts
import {
  convexAuthNextjsMiddleware,
  createRouteMatcher,
  isAuthenticatedNextjs,
  nextjsMiddlewareRedirect,
} from "@convex-dev/auth/nextjs/server";

const isPublicPage = createRouteMatcher(["/auth"]);

export default convexAuthNextjsMiddleware((request) => {
  if (!isPublicPage(request) && !isAuthenticatedNextjs()) {
    return nextjsMiddlewareRedirect(request, "/auth");
  }
  if (isPublicPage(request) && isAuthenticatedNextjs()) {
    return nextjsMiddlewareRedirect(request, "/");
  }
});

export const config = {
  // The following matcher runs middleware on all routes
  // except static assets.
  matcher: ["/((?!.*\\..*|_next).*)", "/", "/(api|trpc)(.*)"],
};
GitHub認証の設定
Convex Auth
Authentication library for your Convex backend
convexのURLをGitHubのOAuthで利用できるようにする。
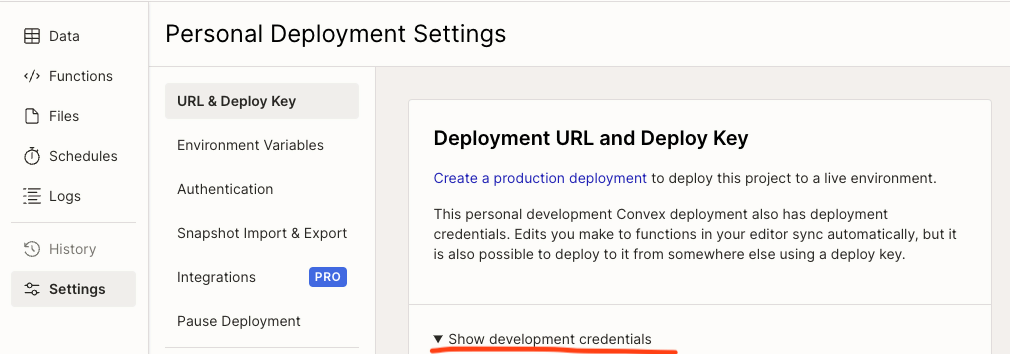
上記から取得したHTTP Action URLに /auth/callback/github
詳しくはコールバックURL の項を参照
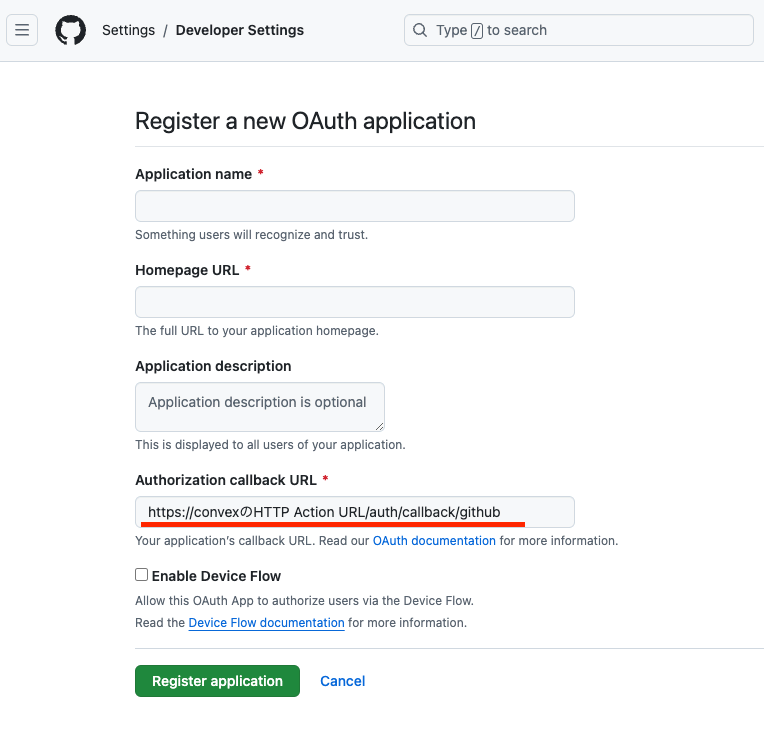
※Homepage URLもHTTP Action URL
GitHubのクライアントIDが払い出されるので、convexの環境変数に設定する。
terminal
bunx convex env set AUTH_GITHUB_ID yourgithubclientid
bunx convex env set AUTH_GITHUB_SECRET yourgithubsecret
convex/auth.ts
import GitHub from "@auth/core/providers/github";
import { convexAuth } from "@convex-dev/auth/server";

export const { auth, signIn, signOut, store } = convexAuth({
  providers: [GitHub],
});
サインインカードにロジックを追加する(省略)
src/features/auth/components/sign-in-card.tsx
import { useAuthActions } from "@convex-dev/auth/react";

export const SignInCard = ({ setState }: SignInCardProps) => {
  const { signIn } = useAuthActions();

  const handleProvider = (value: "github" | "google") => {
    signIn(value);
  };
}
これでGitHubログインが可能となって、OAuth認証結果がConvexに保存される。